Soil Testing for Market Farmers: What to Test, When to Test, and How to Use the Results
by Dell Sauder

If you’re running a market farm and guessing at soil fertility, you’re leaving yield, quality, and profit on the table. Soil testing isn’t just another task to check off, it’s one of the most powerful tools you have to make smarter, more profitable decisions. As my high school teacher put it, “When you aim at nothing, you will hit it every time.” That applies perfectly to soil fertility. If you’re not testing, you’re guessing, and after applying your guess, you’ll still be guessing what the benefit of that application.
Types of soil tests
There are many different kinds of soil tests that have been developed over the years. Without getting into the chemical complexities, let's explore the basic concepts of the various types of soil tests.
Chemical analyses of soil nutrient levels involve mixing soil with water and an additional chemical that extracts or dissolves nutrients from the soil. This mixture of soil, water, and chemical extract is then filtered and tested to determine the level of nutrients in the soil.
Mehlich 3 – Is a robust widely used test suitable for varied soils.
Morgan – has a weaker solution
Bray PT1 – is an older test, best suited for acidic soils.
Olsen – for high PH soils.
I prefer using the Mehlich 3 test as it is an affordable test that can be completed quickly in a lab. The accuracy is consistent across most soils. Unless you know that your soil is at either end of the pH scale, I would recommend the Mehlich 3
When & How
When to Test
You should test at least 30 days after your last amendment application to avoid skewed results. The best times to test are in the fall, when you can plan and make adjustments ahead of the next season, or in early spring if you missed that window and need to fine-tune before planting. If your farm includes different soil types or management zones, those areas should be tested separately. Soil fertility is never one-size-fits-all, and more samples almost always lead to better decisions.
How to Test
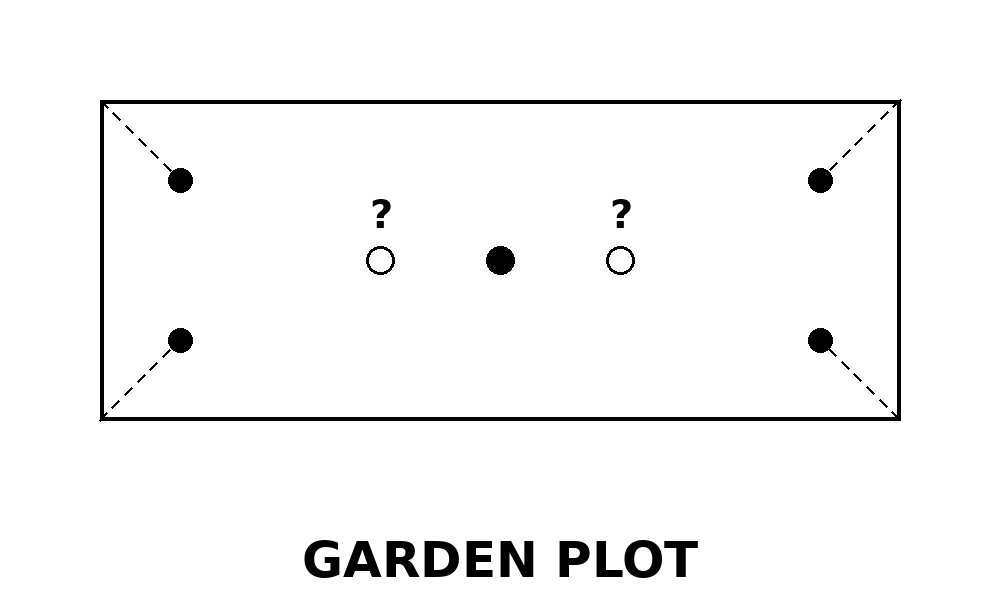
A good soil test starts with a good sample. Using a clean bucket and trowel or a soil probe, take at least five samples from each area you’re testing. The most reliable method is to sample diagonally across the plot, pulling from each corner and including at least one sample from the center. Larger areas require more samples to maintain accuracy(area greater than 10 acres divide before testing ) . The sample area is 4-6 inches deep. Remove the top 3 inches, then collect the soil from 4-6 inches deep. Once collected, mix the soil thoroughly and pull about two cups for submission. The test depth of 4–6 inches is key for early plant growth, as it is the meristematic zone where endophytic microbes will be feeding the plant.
What to Test
Every market farmer should test for key macronutrients such as phosphorus, potassium, calcium, magnesium, and sulfur, along with micronutrients including zinc, manganese, copper, and boron. Organic matter is equally important, as it drives water retention, nutrient-holding capacity, and overall soil health.
While micronutrients are required in smaller amounts, they play an outsized role in plant performance. Boron influences fruit size and development, zinc supports water movement and plant function, copper contributes to disease resistance, and sulfur enhances the flavor of fruits and vegetables. Deficiencies in any of these areas can quietly limit both yield and crop quality.
Let’s dive deeper into these macro and micro nutrients.
Calcium – Calcium in king – Memorize that. Calcium is the building block for all cells, and all life. Without calcium nothing else will work. Your program will fail without addressing calcium first and foremost
Nitrogen – The growth element that supports growth, and chlorophyll production.
Phosphorus acts as a critical "workhorse nutrient" that is fundamental for early plant development, particularly for ensuring rapid seedling growth during germination and establishing strong root systems
Potassium is a vital macronutrient that acts as a primary regulator of plant growth, managing water use, photosynthesis, enzyme activation, and nutrient translocation. It strengthens plant structure, improves resistance to drought and disease, and ensures high-quality yield by enhancing tuber and seed development. Potassium is the nutrient that allows the fruit or seed pod to bulk.
Sulfur is often a neglected "missing link" in high-yielding crop production, playing a crucial role in plant health, yield, and quality. Sulfur is essential for plant protein production, nodulation in legumes, chlorophyll formation, and enzyme/vitamin development. It promotes increased rooting ability (sometimes 30–50% more), aiding in plant anchorage and nutrient uptake. Adequate sulfur is necessary for top seed production in grains and oilseeds, and it directly affects the taste and sweetness of crops like grapes, nuts, and vegetables.
Magnesium is the central atom in the chlorophyll molecule. It is essential for light absorption and energy conversion.
Zinc In key for moisture absorption, flower formation, frost protection germination and vigor.
Manganese Even though very important for stalk strength in all crops, manganese provides several other benefits for land being used for crop production and when too much potassium is applied, it will contribute to these problems as well. Without manganese plants grow off more slowly. A lack of it also affects seed set. And for potatoes, in terms of common scab, the worse the manganese deficiency in the soil, the more problem there will be with this disease
Copper plays a crucial role in agriculture by enhancing plant resilience, preventing specific fungal diseases like rust, and improving the overall taste and nutritional value of crops.
Boron is an essential micronutrient vital for structural integrity and reproductive success in plants, primarily facilitating cell wall biosynthesis, cell division, and sugar transport. Boron is also the “size” setter. Boron acts to transport starches to the fruit and seeds, directly affecting their final size and quality.
How to Use the Results
This is where most farmers get stuck. Interpreting a soil test doesn’t have to be overwhelming. A simple step-by-step approach can help growers prioritize actions effectively. Start by addressing soil pH and calcium levels, as these influence the availability of many other nutrients. Next, evaluate magnesium and sulfur, followed by phosphorus and potassium based on crop needs. Finally, fine-tune micronutrients such as boron, zinc, copper, and manganese. By focusing on the most limiting factors first, growers can make meaningful improvements without unnecessary inputs or expense.
The real value of a soil test comes from how you use the results. First, it gives you a clear starting point by showing current nutrient levels, ratios, and overall soil condition. From there, it guides your decisions by indicating what nutrients to apply, how much to apply, and, just as importantly, what not to apply. Avoiding excess is just as critical as correcting deficiencies. Soil is not just about hitting numbers, it’s about balance. When nutrient levels and ratios are aligned, everything works, from root development to microbial activity soil compaction to overall crop performance.
A Soil Test Tells You What to Do
To make an exquisite chocolate cake, you must adhere to the correct levels and ratios of each component. If the ratios and levels are off just a bit, flavor declines. If they are way off, you don’t get chocolate cake. Soil is the same way. By using a soil test to adjust levels and ratios of available nutrients, we can meet nature’s requirements and create a healthy environment.
Here are some desired levels or ratio’s
Calcium 68-72 % base saturation
Potassium 3.5-7 % Base Saturation
Magnesium 10-12% Base Saturation
Phosphorus 75-100 PPM
Sulfur 25-50 PPM
Zinc 5 PPM
Manganese 25-45 PPM
Iron 12-45 PPM
Copper ½-2 PPM
Boron 2 PPM
Let’s dive into the details. First lets see where your calcium level is. NO, we wont look at the PH. We will look at the base saturation percentage. Your calcium should be 68-72 percent of base saturation. To correct your calcium deficiency here’s the formula.
Calcium Calculation Example
Focus on base saturation, not pH.
Formula:
(Desired % − Actual %) × CEC × 400 = lbs/acre of calcium carbonate
(CEC Cation Exchange Capacity will be listed on your soil test. In short, it is the nutrient holding capacity of the soil)
Example:
Desired: 70%
Actual: 52%
CEC: 12.5
Calculation:
0.70 − 0.52 = 0.18
0.18 × 12.5 = 2.25
2.25 × 400 = 900 lbs/acre
If using a product with 38% calcium:
900 ÷ 0.38 = 2,368 lbs/acre of product
For smaller areas:
Divide by 43.5 to get pounds per 1,000 sq ft.
Let’s circle back to pH and calcium and discuss that relationship for a minute. pH represents “potential hydrogen.” How do potential hydrogen and calcium correlate to anything? Great, I’m glad you asked.
First, I have no idea why pH is so commonly viewed as a guide for calcium. Secondly, I’ll explain the common representation.
Applying calcium carbonate to acidic soil is the standard method for raising pH. Calcium binds with hydrogen ions, reducing acidity and raising pH.
Here’s the question: why is calcium singled out from the other cations? The answer is simple, because it has been for the past century.
The truth is, potassium, magnesium, and sodium also contribute to affecting pH. I see soil tests every day where the pH is in range, but calcium is very low.
Remember, calcium is KING. You will struggle to grow a healthy crop if your calcium is low.
You need to test for each element if you want to know the levels. Make sure your test specifically tested calcium as an element.
Using pH to guess the calcium level would be comparable to your doctor using only your cholesterol level to diagnose your health, while skipping a scheduled physical and full health discussion.
A Soil Test Helps You Succeed
You will now need to transfer from data to a fertility plan. You must always start with Calcium. Each area will have a different local calcium source available. Points to consider, is the Calcium a high Mag lime ? Does your soil test have room for the added Mag or will you be skewing ratio’s. When dolomite is applied in too large of a quantity it can cause an excess in magnesium and have a negative effect on yields. The problem is it can be as long as three years after the excess lime has been applied before seeing the greatest amount of potential damage to the crop yields. By this time, unless the grower has kept good records, a connection between the liming and declining yields may be overlooked. (A moral here is to keep good records of when, where, how much and what type of lime each field receives.) Have you applied dolomite lime on any of your fields in the last few years? If so, count three crop years from the time of application and check the yields that year and thereafter as compared to yields prior to liming. Even if the applied magnesium from dolomite lime will have a detrimental effect, do not expect to see that yields have dropped the first year. All Elements have relationships with the other elements. These relationships are either synergistic and antagonistic. This concept is what established the percentages or PPM’s that were listed earlier in this article.
I recommend Aragonite as choice source of Calcium Carbonate. Aragonite is a highly soluble, natural marine calcium carbonate derived from seashells, used to rapidly improve soil health. Aragonite will provide a benefit to the crops in weeks, unlike lime that can take months to years to provide a benefit.
After the calcium is addressed we look at the Magnesium base saturation percentage, and the sulfur PPM. We than move to N-P-K and look at the projected crops needs and what levels are in the soil. Then for the final review, we look a Copper, Zinc, Boron. The micro nutrients can be difficult to apply in a uniform application because of the minimal amount of product needed. Many natural fertilizers have the micro elements included, and this will allow for much more of an uniform distribution. If you need a ton or more of a fertilizer you could get a mix blended specifically to the needs of your soil, with all micro nutrients included. There are several fertilizer companies who will blend to your custom needs.
Another option for growers to customize their fertilization program—if their fertilizer doesn’t include all the elements needed to balance their soils—is to purchase sulfur, copper sulfate, zinc sulfate, and boron, and mix these elements into a material they are already applying, such as aragonite or compost.
To calculate the amount to add, first start will your needed PPM ( parts per million) deduct the level your test shows from the target level. That number will become the amount needed buy multiplying PPM x 2 = pounds per acre.
Next you need to know the purity of the element your adding. Common levels are Sulfur 90%; Boron 10% ;Zinc sulfate 36% Copper sulfate 25%.
For example, your test shows Sulfur at 8PPM
So we’ll use 40ppm as the target for sulfur as its in mid-range.
40ppm (target) – 8PPM (actual) = 32PPM needed x 2 = 64 pounds per acre with Elemental Sulfur at 90%(purity) you divide 64pounds by 90% = 71 pounds of elemental sulfur needed.
Now I’ll address the Cult of Compost: This phrase is used to describe a "legion" of followers who have an intense, almost religious devotion to composting, potentially ignoring the nuance of its actual effectiveness or chemical composition. I have seen more putrefied garbage than compost. In the holy devotion of wanting to be part of the” in crowd “ many have taken a shortcut and by- passed facts. It is imperative your compost inputs are balanced, temperatures are correct while curing and the pile is aerated as NEEDED – NOT as you have time or convenance. I wont discuss the compost process, I’ll only give some principles. 1) only use compost that you have Lab tests results for a minimum the NPK values. 2) only apply in accordance to the soil test deficiency’s 3) Don’t apply compost “because we have it” 4) I hear many farmers say they have more work than time. Ignoring compost and buying the correct inputs can help reduce your work 5) Using your own compost ONLY saves you money if: it is quality compost, Your soil and plants need those specific nutrients, and you have time to produce it correctly. 6) compost is NOT the holy grail of farming – you are still cool even if you don’t make compost.
Remember, your fertility program will be good as your weakest link. You will never offset deficiencies with excess in other nutrients. Too many times excesses have come from cheap or free input sources. Just because its cheap or free doesn’t suggest it will produce a crop for you. Many times, a severe deficiency will also need to be addressed during the growing season in a foliar.
Many growers find value in consulting with experienced agronomists or crop advisors when interpreting soil test results and developing fertility plans. Professional guidance can help translate laboratory data into practical, site-specific recommendations that align with organic management principles and long-term soil health goals. Whether working with a trusted advisor, Extension specialist, or independent consultant, the objective remains the same: to create a balanced fertility program that supports consistent yields and high-quality crops.
Turning Data into Profit
At the end of the day, soil testing is about efficiency.
The results help you to:
• Avoid over-applying expensive inputs
• Correct deficiencies before they impact yields
• Improve crop quality, consistency, and insect resilience
• Build long-term soil health
And for market farmers, consistency is everything. Your customers expect quality week after week, and your soil is what makes that goal possible.
If you’re not soil testing regularly, you’re farming blind.
If you’re farming blind, you are aiming at nothing, and you will hit it every time.